
How does solar power work? Solar power involves the conversion of the energy contained in sunlight into electricity. This electricity can then be used for something useful, from charging batteries and small electronics to powering your entire home or business.
I’ll help you understand the parts of a solar power system, how components such as the inverter and solar panels work together and how to cut through the industry jargon.
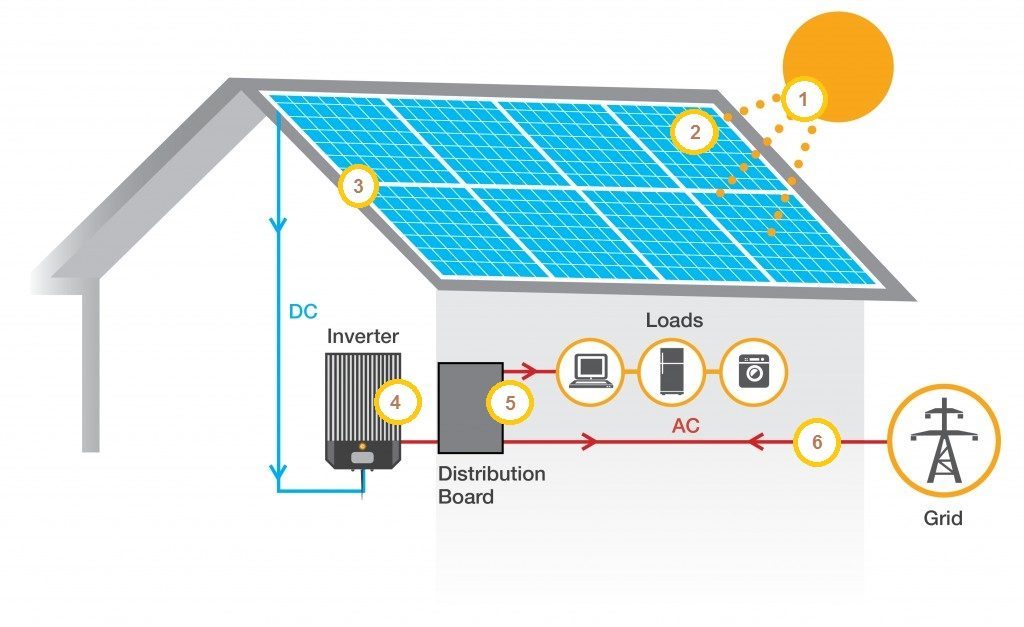
How Solar Power Works – Step by Step
The following Youtube video from the UK is a good visual introduction to solar power. It’s only two and a half minutes long but repeats twice so feel free to quit out at the half way mark.
If videos are not your thing, then I also work through the steps below:
Step 1 – Sunlight
Rays from the sun hit our earth every day. This sunlight contains energy which you can feel as heat, and see as light.
This energy is free, renewable and plentiful. Solar power harnesses this energy to generate useful electricity, through something known as the photovoltaic effect.
Solar power harnesses this energy to generate useful electricity, through something known as the photovoltaic effect.
Step 2 – The ‘photovoltaic effect’ & solar panels
Very simply, the photovoltaic effect happens when a material absorbs light and separates out the energy in the light, allowing it to flow as electricity.
This effect was first demonstrated during the early 1800’s using chemicals, but modern photovoltaics use materials such as thin wafers of silicon and other materials.
These thin layers of photovoltaic material are most commonly packaged beneath a layer of glass, creating what we commonly call a photovoltaic (PV) cell or ‘solar panel‘.
Step 3 – Connecting multiple panels together
Each solar panel generates only a small amount of electricity, therefore to generate a useful amount of electricity you are most likely going to need quite a few panels put together.
The panels are connected together with electrical wires in what’s known as strings. The electricity from each panel is combined to generate a useful amount, the exact level will be determined by your solar power system design. to combine the electricity generated from each
The electricity produced by solar panels is what is known as direct current, or DC.
This DC electricity is similar to the power you get out of a battery. But like a battery, the DC electricity is not the same as the power that flows through your local power grid and comes out of your powerpoints at home.compatible with large home appliances such as fridges, washing machines powered by your home or business wiring.
DC can be a great option for an off-grid home, bach or caravan.if you are looking to connect your solar system to the grid, you will need to convert the DC power to alternating current, or
However, if you are looking to connect your solar power system to the grid, you will need to convert the DC power to alternating current, or AC power, using an inverter.
Step 4 – Creating AC power using an inverter
The voltage of the grid is 230V AC. This is the voltage that your home appliances and lighting are designed to operate at.
An inverter, or multiple inverters, takes the DC power and converts it to AC. They are also smart enough to monitor the health of your solar panels, alert you to problems, and ensure that the electricity flowing into your house is going to be compatible with your appliances and the local power network.
Your inverter will connect into your home switchboard, allowing the electricity your solar panels generate to power your home.
Step 5 – Storing or exporting excess power
When the sun is shining, your solar panels will be generating electricity. If the electricity is not being used within your home at the same time, it can be either stored in a battery or exported to the grid.
For most residential solar power installations, battery storage is not likely to be economic therefore any excess power generated will be exported to the local power distribution network.
The rate you will get for your exported power is known as the solar buy-back rate and can vary depending on your location and power retailer.
If you have a battery integrated into your solar power system, this can absorb excess energy and then release it when you are at home. Giving you the full benefit of the energy you generate, without having to purchase the power from a power retailer.
Step 6 – Metering
Your home or business has a power meter at the moment. This meter is designed to record the energy you use.
If you have a grid connected solar system, when your usage is low and the sun is shining, you are likely to be exporting some energy to the grid. Therefore you will need to have a different kind of meter, called an export meter, installed.
This is a slightly souped-up version of your standard meter, designed to record power flowing both ways. Into your property, and back onto the network.
There may be fees associated with installing an export meter, depending upon your power retailer.
Summary
- Sunlight hits your roof, and solar panels convert this into DC electricity
- Multiple panels will be connected together to generate a decent amount of electricity
- An inverter will take in the DC electricity, and output AC electricity that is suitable for powering your home
- If you are generating more than you are using at any one time, the extra power will be stored in a battery or exported to the local power grid, and
- Your exported power is measured by an export meter, and you are typically paid for the extra power exported.
Solar Power System Components
Now we will go into a bit more detail about the separate components of your solar power system and how different solar panels work.
Solar Photovoltaic (PV) Panels
These are the powerhouse of your system. Converting the energy in sunlight into DC electricity.
There are three common types of solar panel you will find out there, which are made in slightly different ways.
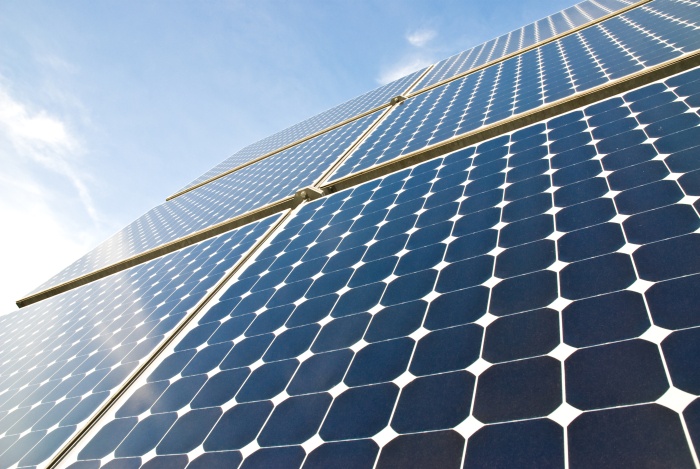
Monocrystalline Solar Cells
This is the original type of solar cell, designed back in the 1950’s and created from an individual, artificially grown silicon crystal cut into thin wafers. Mono is Greek for ‘alone’ and reflects that each wafer is cut from one single crystal.
The panels will appear to have a very consistent black or dark blue colour, and each solar cell will appear to have ‘clipped’ corners as square cell wafers have been cut from round silicon crystals.
Advantages
Monocrystalline panels are typically constructed from high-quality individual silicon crystals. They have the highest efficiency of converting sunlight into electricity. Between 15% at the lower end and as much as 24% for high-quality panels. Production panels are typically around 18% efficiency and increasing.
The higher efficiency of monocrystalline panels means that you will get a greater energy output for the same installed area, compared with other lower efficiency panel. Great if you are limited on space.
Monocrystalline panels also tend to have longer warranty periods and maintain better power output rates after long periods or time.
Disadvantages
Monocrystalline solar cells are the most expensive to produce although prices continue to drop. Once many cells are assembled into solar panels, the monocrystalline panels still retain some price premium.
If your panels are at risk of shading or you commonly have cloudy skies, monocrystalline panels are also more sensitive to obstruction than polycrystalline panels.
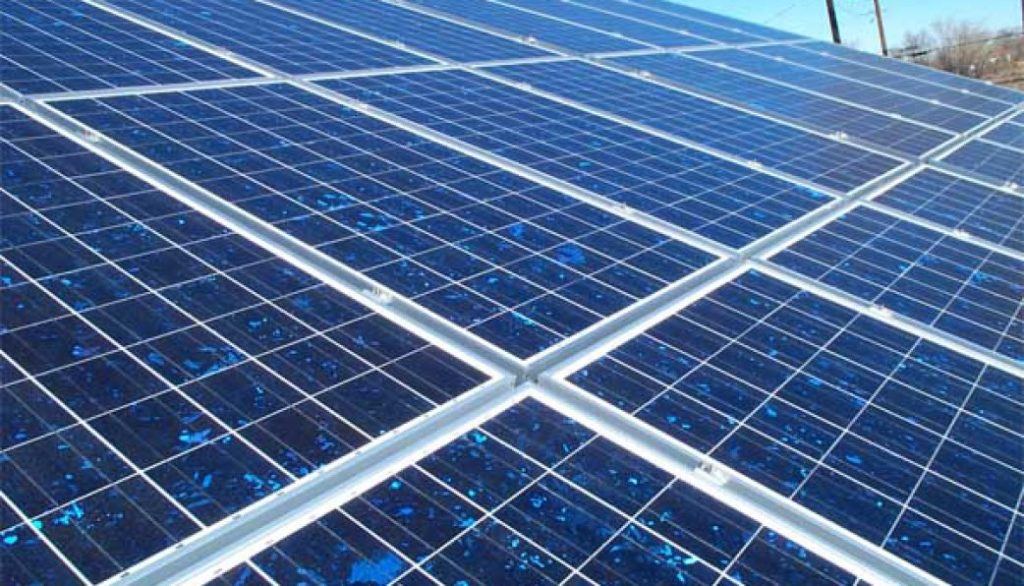
Polycrystalline Solar Cells
Like monocrystalline cells, this type of solar cell is also made from artificially grown silicon crystals. But instead of each cell being cut from a single crystal, multiple interlocking crystals are pressed together in a mould.
This makes the cells cheaper to produce and gives them the name ‘poly’ derived from the Greek word for ‘many’. Polycrystalline panels may also be referred to as ‘multi-crystalline’.
Polycrystalline solar panels have a mottled look, like a piece of particle board. This is due to each wafer being a slice of multiple interlocking crystals pressed together. Poly cells are square and don’t have the same ‘clipped’ corners appearance as mono cells above.
Advantages
With a cheaper, more efficient manufacturing process that produces less wastage, polycrystalline panels are generally a more cost-effective solution.
They also tend to perform better if you have issues, or may have issues, with panel shading or often experience cloudy skies.
Disadvantages
The efficiency of polycrystalline solar cells is lower overall than monocrystalline. Efficiencies ranging from around 13% for lower-end panels up to 18%, and increasing as time goes by.
According to Australian panel manufacturer Tindo Solar. One square meter of monocrystalline solar cells will generate around 190W, whereas one square meter of polycrystalline solar cells will generate around 180W.
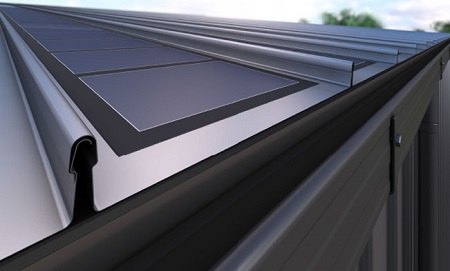
Thin-film Solar Cells
Also known as ‘amorphous’ solar cells, thin-film cells are the cheapest type of cell to produce and are relatively new to the production market. cooper koch nude
The are produced differently to the other two types as they are not sliced from grown silicon crystals. Instead, silicon is deposited directly onto a thin backing called a substrate.
This makes thin-film panels light-weight, flexible (!) and easily mass produced. However current technology has a significantly lower efficiency than other panel types.
The end result also has a very consistent look, so thin-film solar can be less obvious, and more visually appealing than larger mono or poly panels.
Advantages
Thin-film is an easily mass-produced, affordable solar panel option.
Physically, the panels are lightweight, can be flexible, more architecturally appealing and can potentially be adapted to a wider range of situations than the larger, fixed panel designs.
Thin-film panels are also more resistant to shading or obstruction issues and perform better in low-light conditions than poly and especially mono panels.
A number of New Zealand roofing companies such as a Metalcraft are offering options to integrate thin-film solar into their products.
Disadvantages
Thin-film panels currently have the lowest efficiency rating of 7% – 13%, with most production panels around the 9% mark.
This means that at present you require twice as much panel area to get the same output as quality monocrystalline panels. Don’t let this put you off thin-film, it’s just another aspect that needs to be taken into account.
As they are a newer technology, you may also find more variation in production methods, compatibility, quality and reliability of the end product as the two other panel types.
Operating Temperature
Monocrystalline, polycrystalline and thin-film panels perform slightly differently under extreme temperatures. Mono solar panels work marginally better at higher temperatures than polycrystalline panels, and thin-film is the least heat sensitive.
This is important if you’re in the Arizona desert, but in NZ the difference is so negligible I wouldn’t let temperature performance be a deciding factor in your panel decision.
Solar Panel Mounting
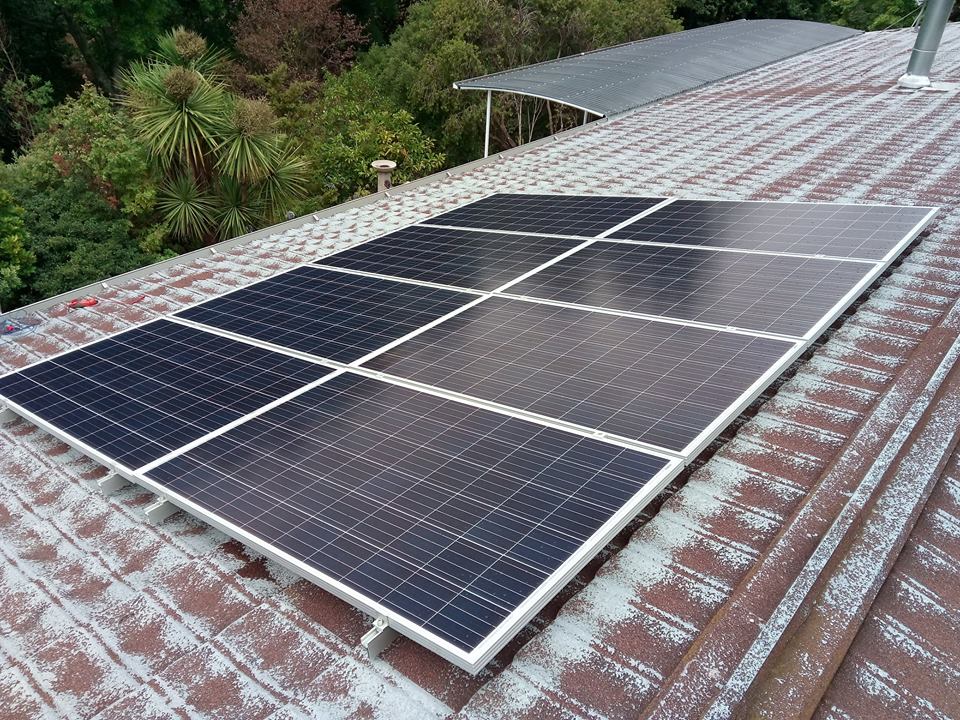
Your Roof
Solar panels can be installed on most roof types, including:
- Iron / Coloursteel
- Concrete tile
- Metal tile
- Slate, and
- Butynol.
As the cost of solar technology becomes cheaper and more advanced, roofing and cladding solutions are emerging that integrate solar. Local examples exist, such as Solar-Rib by Calder Stewart and Metalcraft (mentioned above). There is of course the much lauded at launch Tesla solar roof but this seems to have fallen by the wayside since.
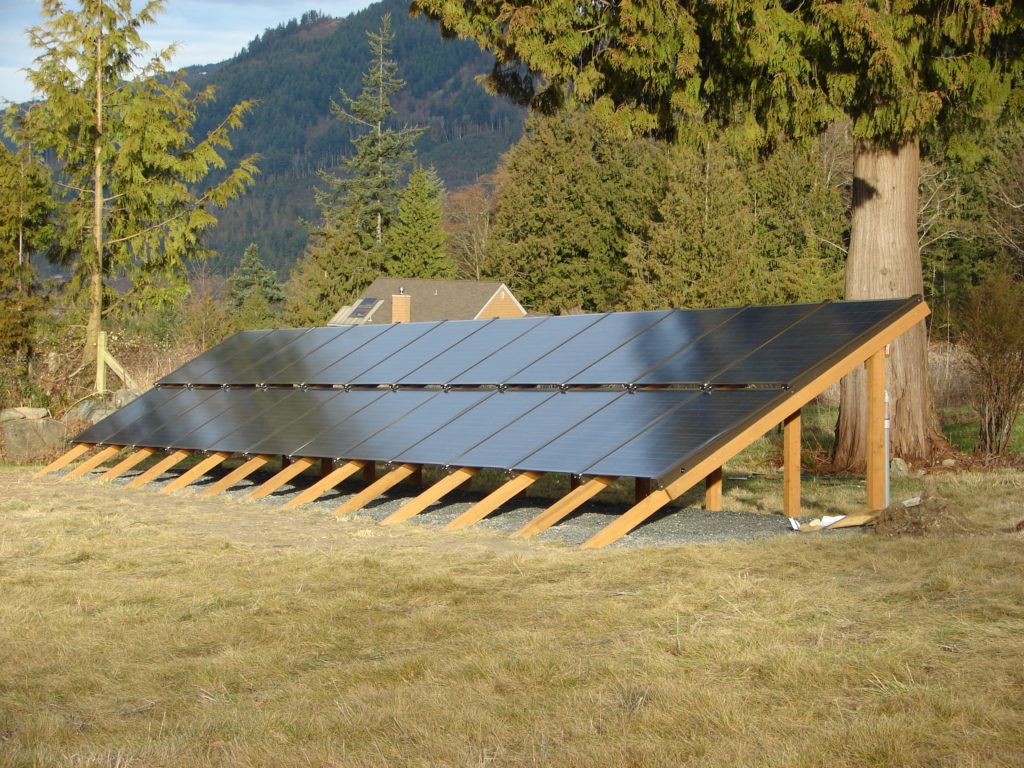
Ground Mounted Solar
If you have the land area, ground mounting of solar panels is another option.
Advantages
Ground mounting can help ideally angle your solar panels to optimise power output. It also can provide a larger area than a rooftop and make access for panel installation and cleaning simpler.
It may also help you lower the installation and wiring costs, depending on the distance from your main switchboard.
Disadvantages
The major disadvantage is that a structure is required, rather than fixing to your existing roof. Ready-made frames can be purchased, or you can erect a wooden frame to suit your installer’s requirements.
Shading of panels be trees and buildings may also be an issue for ground-mounted panels, so make sure you will have clear unobstructed sunlight.
When choosing a panel location, also consider how the wiring will be run back to your main switchboard. Make this practical and efficient for the installer.
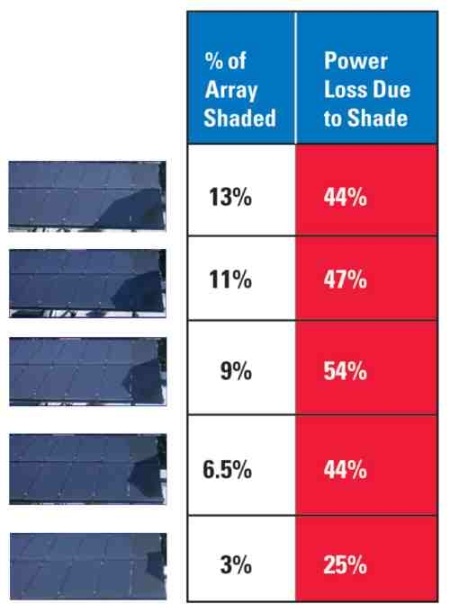
Avoid the Shade
To maximise the benefits of your solar system, you should try to minimise the amount of time the system is shaded.
This includes locating the system away from nearby tall buildings, trimming nearby trees and ensure the panels are kept clear of leaves or moss.
A friend of mine who has a monocrystalline solar panel array installed early 2000’s, reports that even putting his thumb over the corner of one panel significantly reduces the output of the array as a whole.
Renewable Energy World has reported that shading only 9% of the area of a solar panel installation can reduce the output of the whole array by 54%.
Inverters
Inverters convert the DC electricity that your solar panels produce into appliance-friendly AC electricity.
They don’t just blindly convert the electricity, modern inverters continuously monitor and adjust the power conversion process to maximise efficiency. This is called maximum power-point tracking, or MPPT.
MPPT is an important feature to consider for your system as it ensures you extract the maximum energy, and financial benefit, from your purchase.
For grid-tied solar systems, there are two main types of inverter each with their advantages and disadvantages.
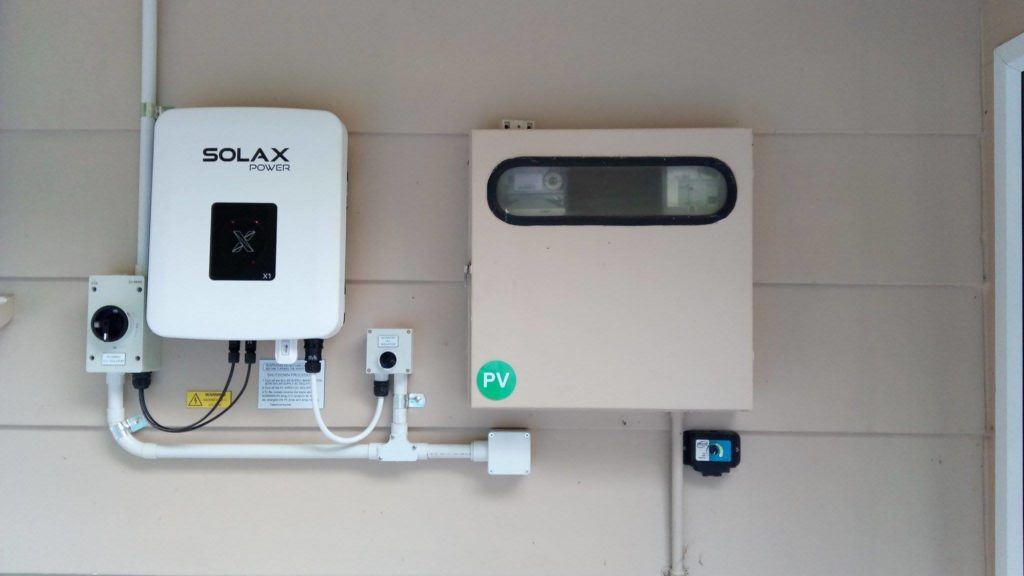
String Inverter
A string inverter, also known as a ‘central’ inverter, is your typical solar power system inverter. A single ‘box’ that takes in DC power and outputs AC power.
They are usually mounted close to your switchboard, for example on an internal garage wall, and can typically convert from 1 kW up to 5kW of solar power to AC.
For larger arrays, multiple string inverters can be utilised. For example, a 9kWp solar array could have 2 x 5 kW inverters, or 3 x 3 kW inverters.
Advantages
A single string inverter, indoors, away from the elements will convert all of your electricity. Typically a single larger unit is cheaper than multiple, smaller inverters.
String inverters typically have a high-efficiency rating, converting 95% to 98% of the input DC power into output AC power.
Modern string inverters typically offer performance monitoring on a small screen at the inverter and also remote monitoring via an internet portal, your phone or directly over wifi.
Disadvantages
A single string inverter will see higher DC voltage and current than multiple smaller inverters. This means it may run hotter than individual smaller units.
Due to all panels being connected to a single string inverter, the system will typically optimise to one, or for larger units two, MPPT points. This can lead to lesser panel output than using micro-inverters, especially if there is a risk of shading.
The shading of only one panel in a large solar array can significantly affect the efficiency of the system as a whole. Reducing the output of all panels.
String inverters come in limited power ratings, typically in multiples of 1000W (1kW). Typical sizes might be 2kW, 3kW, 5kW etc, depending upon manufacturer and which brands your installer works with. Because the size of string inverters is limited, you may end up having to pay for one that’s bigger than you actually need.
The manufacturer warranty on string inverters is typically five to ten years, compared with 15 to 25 years for micro-inverters.
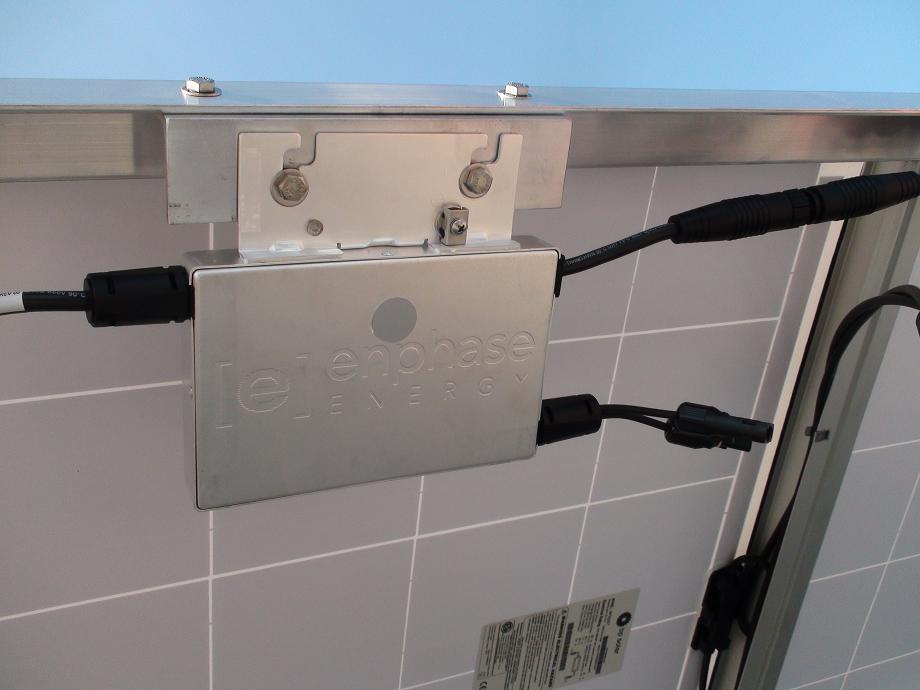
Micro-Inverters
Micro-inverters are essentially small string inverters. which have been on the market since the 1990’s, but only became price-competitive with string inverters late 2000’s as solar power became more common.
One micro-inverter is attached to the back of each solar panel. They take one panel worth of DC electricity and output one panel worth of AC electricity. The power rating of a single micro-inverter is typically 200W – 300W.
Advantages
Micro-inverters monitor the power and optimise at a single-panel level. Therefore they are best for installations where one or more panels may be shaded, or where panels are facing different directions.
Using a panel-by-panel optimisation, a micro-inverter based system should produce slightly more power than a string inverter system from identical panels.
For the owner, being able to see the performance of the system on a panel-by-panel basis helps identify issues with individual panels quicker.
Dependant upon your individual setup, having the microinverters away from your garage on the roof may be of benefit. Additionally, they are silent whereas a single larger string inverter is likely to have a cooling fan.
The number of micro-inverters is by default aligned with the exact number of solar panels that you have.
Micro-inverters usually have a longer warranty than string inverters, typically 15 to 25 years dependant upon the manufacturer.
Disadvantages
Microinverters are typically more expensive than string inverters, with a marginally lower overall efficiency between 94% and 96.5% for an array of micro-inverters.
Unlike a string inverter, micro-inverters will be mounted on your roof which means they are more exposed to the weather, both the unit and AC cabling. This may be an issue from a degradation/weather damage perspective, and also access post-installation.
Metering
Metering should not be a major issue, apart from the cost to install an export meter that measures not only what you use from the grid, but what you sell back.
Your new export meter should fit nicely in the existing meter box, like in the picture below.
Ongoing Maintenance and Monitoring
In a similar manner to your home electrical wiring, solar power systems have no moving parts to repair or replace and are for the most part a hands-off investment.
However, like your home electrical wiring, if issues or damage occurs it’s best to call in the experts.
Your individual system may have specific warranty requirements, such as regular cleaning, inspection or testing. It’s best to confirm with your installer and obtain any requirements in writing to ensure you get the benefit of your system warranty.
Cleaning & Shading
The energy output of your panels is directly related to the unobstructed sunlight they receive.
You should regularly check your panels to ensure:
- the glass remains clean
- panels are not covered by leaves, dirt or moss
- birds have not nested around the panels and
- nearby trees have not grown so that they shade the panels during the day.
If panels are accessible, a telescoping house cleaning brush can be a good way of reaching them. Careful cleaning with warm soapy water will ensuring maximum power output. Remember to isolate the panels before cleaning!
Electrical Wiring
If you have any concerns around your electrical wiring, you should speak with the solar installer in the first instance and most likely a registered electrician will be required to undertake any close-up inspections or remedial works.
Inverter, Battery and Control
Your inverter(s), battery storage (if installed) and any extra control equipment will have been optimised to your specific installation when installed.
At installation, it is always recommended to ask for a copy of the original installation documentation, settings, installer and maintenance codes (if applicable) and tuck these away for future reference. It is not recommended to use these yourself, but they may be useful in 10 years time when your original installer has retired or moved on.
If your system is expanded in the future, appears to be operating outside of the norm or showing an alarm. Please contact your original installer.
Ongoing Monitoring
For modern installations, your inverter or control device will show key data on your system so you can watch your solar panels work. You may also have an internet or mobile phone portal you can access to review existing and historical system performance.
Keep an eye on your system performance to ensure your system continues to generate you the expected amounts of free, renewable energy.
Jargon Buster
Distributed Generation – Another name for small power generators, such as solar power or individual wind turbines. Typically with a power output less than 10kW.
Feed In Tariff – Another name for the solar power buy-back rate, more common overseas. For more details, see here.
Photovoltaic – With photo meaning ‘light’ and voltaic referring to electricity or volts, this simply means ‘energy from sunlight’. Commonly abbreviated to ‘PV’.
Useful Links
- Comprehensive List of NZ Solar Installers
- Solar Power Buy-back Rates & Meter Costs
- List of New Zealand Power Retailers
Thank-you so much for creating this very useful site. I’ve enjoyed reading the content and feel I’m much more informed about solar in general.
I have tried to sign-up with P2Power but they aren’t in Christchurch yet.
Love what you’re doing here and will make a donation.
Hello Nathan, and many thanks for your very useful site. I’m an EV owner, living in Leigh (an hour north of Auckland and am wanting to explore off-peak rates for EV charging overnight. Can you advise which providers offer off-peak rates? I’m also considering solar panels with battery for house so will have further reason to keep an eye on your site for useful information.
Thanks in advance for your help,
Judson
looking to put a solar system on our home